Wednesday, April 4, 2012
Floor Lamp Revamp (under $42) and Living On The Fringe Cushioned Bench (under $19)
Another floor lamp bought at auction.
A tad on the ugly side to start with, for certain, but it had a great, heavy base with a glass feature. It looked like this when I got it:
I removed all of the old wiring and socket. It didn't require taking the whole thing apart for the removal, so I just taped over the glass area on the base before I sprayed painted it.
I went with a soft, pale, butter color for the paint. This lamp had some miles on it, had been fixed a few times, rewired, and painted at some point in its long life. I gave it a few coats of paint to cover well.
I fitted it with a new light socket and cord. The lamp originally had a main light, and three lower lights. Rewiring the three lower lights was a bit beyond my current (pun intended) capabilities, and I really didn't mind having just one light instead of three - so I simply recapped the three (now open) hollow branches of the lamp with gold acorn finials. They fit perfectly and looked nice.
Then, a trip to Joann Fabrics to choose a fabric and trims for the shade, and to pick up a piece of foam for the cushioned bench I was planning to make from basement bench #2 (see previous post).
Again, I purchased a self-adhesive shade. I added the fabric and used hot-melt to glue the fringe around the base of the shade. I chose a complimentary color for the bias tape on the top edge and used Eilene's Tacky Glue to secure that to the top. (If you were so inclined you could cut and iron your own bias tape from self-fabric instead.)
Another old table, just catching dust in a corner of the basement.
I painted the legs a dark chocolate gloss brown.
A serrated knife cut through the foam just fine (I sharpened the knife right before trying this). I had to piece my foam together to fit the top of the table, but it was perfectly fine.
The table/bench with foam on top.
Um, yes, this is how I work sometimes. Staple first, cut as you go.
A better view of the underside, as I stapled it over the rectangle of foam, to the wood table flange.
These tall corners seemed to look best folded almost straight downward, after the sides have been tucked under them. I don't have a photo of the next step, but in keeping with having all the edges underneath nice and neat, I also glued 1/2" wide grosgrain ribbon over the stapled edge.
I applied the same fringe trim as I'd used on the lampshade. Hot melt always seems to work best for this, and once it's applied to fabric - it's very hard to remove. So the trim stays put really well.
And they look good together. I have both of these in my living room. Yes, happy with them.
Cost breakdown for the floor lamp:
* Lamp: $1
* Paint: less than $2
* Light fixture: $9
* Self-adhesive shade: $14
* Fabric for the shade: less than $3
* Fringe: less than $4
* 3 gold finials for the lamp: $9
total = under $42
Cost breakdown for the fringe-y bench:
* Table/bench: free
* Paint: less than $1
* foam pad: $9
* Fabric: less than $4
* Fringe: less than $5
total = under $19
(in a hushed whisper) I See Polka Dots... (bench) under $6
I had a small table/bench sort of thing in the basement, (actually I had two, but the second one is another post...), that was not particularly lovely.
It looked like this to start:
Yeah.
It had an awful wood-look sticky contact paper on the top that wouldn't come loose, but the legs and base were solid, sturdy, and cute.
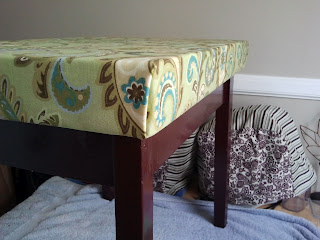
I painted the base and legs green to match the floor lamp I'd redone earlier, then added a layer of poly batting to cover the top.
I covered the batting layer with the same fabric that I had purchased to cover the floor lamp's shade. Basically I just folded the edges under, while keeping the fabric taut across the poly batting, and stapled it in place to the wood flange of the bench top. Fold the corners in carefully, so you get the look you want on the top while keeping the underside looking nice and neat too.
It turned out well. I'm happy with it. (Apparently I'm shy on final pics for this one, but will update with a better pic of it when I can...)
Cost breakdown:
* Table: free
* Paint: less than $2
* Fabric: less than $4
Monday, April 2, 2012
Same Old Song to The Muse Within (under $11)
I picked up this chair at a thrift shop for $6. The photo below shows the chair as it looked when I purchased it. I liked its curvy lines, and the motif inside the chair back.
It's called a Lyre Back chair, for obvious reasons. The lyre instrument motif has been incorporated into chair backs almost since chairs were invented, apparently. Anyway, it's lovely.

I cut out 3 layers of poly batting for the seat. Yes, I have rolls of poly batting here. Who doesn't?
I used 3 layers of poly batting, 2 layers of mid-weight interlock, and one layer of decorative fabric print I'd picked out specially at the fabric store on Saturday. The red and black feather-y print looks gorgeous with the dark red paint on the chair.
By the way, here's what the back should look like. I like all the raw edges covered as much as possible.
Fold and pull the corners tightly and neatly. They should look something like this:

Add the seat cushion back on, and secure with wood screws.
I had a little trouble uploading the photo shown above, otherwise I would place it into the correct order - but here are all the layers of batting and fabrics. The red fabric is the interlock, it provides a great taut, soft, smooth finish for the thinner, outer, decorative print.
It's called a Lyre Back chair, for obvious reasons. The lyre instrument motif has been incorporated into chair backs almost since chairs were invented, apparently. Anyway, it's lovely.

It was in pretty good shape. The chair seat had been upholstered twice (the bottom one was probably original) and the last re-do had been done with a lot of messy glue of some kind, that had dripped into hardened glue-cicles down the legs. Fortunately, I was able to peel the glue off with the help of a putty knife.
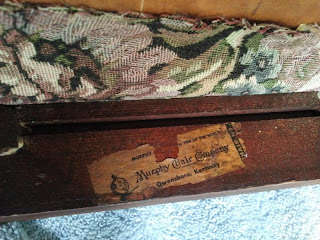
I thought it was a recently made cheap version, until I started taking it apart at home, and found that it was pretty old, judging from the labels I found underneath.
I covered the labels to preserve them, before I painted the chair. There is something charming about old labels (there's a round-headed mascot on the one shown above) and it adds a little bit to the history of the piece.
I removed the chair seat, which had been glued in place by a previous re-upholsterer, and chipped/peeled off any remaining drips of hardened glue.
It got a couple spray coats of Colonial Red Rustoleum paint.
I cut out 3 layers of poly batting for the seat. Yes, I have rolls of poly batting here. Who doesn't?
I used 3 layers of poly batting, 2 layers of mid-weight interlock, and one layer of decorative fabric print I'd picked out specially at the fabric store on Saturday. The red and black feather-y print looks gorgeous with the dark red paint on the chair.
By the way, here's what the back should look like. I like all the raw edges covered as much as possible.
Fold and pull the corners tightly and neatly. They should look something like this:

Add the seat cushion back on, and secure with wood screws.
I had a little trouble uploading the photo shown above, otherwise I would place it into the correct order - but here are all the layers of batting and fabrics. The red fabric is the interlock, it provides a great taut, soft, smooth finish for the thinner, outer, decorative print.
Yes, I'm happy with it.
Cost:
* Chair: $6 at a thrift shop.
* Paint: less than $2.
* Fabrics: about $3.
** total = less than $11
Subscribe to:
Comments (Atom)


